A countertop seam can look acceptable before adhesive cures and still reveal a visible ridge once the pieces are permanently joined. The setter you choose affects more than how tightly the slabs come together. It also determines how precisely you can control height, joint width, and pressure while the adhesive sets.
The best seam setters for quartz countertops give installers controlled mechanical force to pull adjoining slabs together and hold them level, helping create tight, flush joints with less lippage. Look for a system that matches the slab thickness and grips the surface securely. It should allow fine height and gap adjustments and work with the adhesive and curing process used for the installation.
Quartz and granite demand a steady, measured approach because excessive clamping force can stress an edge, while insufficient control leaves alignment to chance. Start by understanding what these tools actually do at the seam, then compare the clamp and adjustment systems that fit your fabrication workflow.
Shop seam setters and stone fabrication tools at Diamond Tool Store.
What Are Seam Setters for Quartz Countertops?
Seam setters are alignment tools that pull two quartz countertop slabs together, hold their surfaces level, and keep the joint stable while the adhesive cures. They combine controlled clamping with vertical adjustment, giving the installer a practical way to position the pieces before the seam becomes permanent. The goal is a tight, flush joint that is as close to invisible as the material, cut, color, and lighting allow.
Why quartz seams need controlled alignment
Quartz slabs are manufactured surfaces, but they still require careful handling at every joint. A seam concentrates stress, and a small mismatch in slab position can remain visible after the adhesive sets. Even a slight height difference, called lippage, can catch light, feel rough under a hand, and make the countertop look poorly fitted.
A seam setter gives the installer mechanical advantage instead of relying on hand pressure or improvised clamps. Its pulling action closes the joint, while its leveling mechanism helps bring the adjoining surfaces into the same plane. This precise positioning is the starting point for a tighter, less noticeable seam. It also helps maintain more consistent pressure along the joint. Supporting an even adhesive bond rather than a seam that is tight in one area and open in another.
How a seam setter works during installation
Most seam setters grip the polished slab faces with vacuum cups or another secure clamping system. Once the slabs are positioned, the tool is adjusted to draw the edges together and fine-tune their elevation. The installer can then inspect the joint, remove excess adhesive, and confirm flatness with a professional-grade level before leaving the tool in place.
The setter is not a substitute for accurate fabrication. Both pieces still need properly prepared edges, a clean bonding surface, and an adhesive selected for the material. Quartz typically contains resin, so its joining requirements can differ from those for natural granite. The setter's job is to hold the prepared pieces in the correct relationship while the adhesive develops strength.
What makes a seam nearly invisible?
Three conditions matter: the edges must meet cleanly, the slab faces must be flush, and pressure must remain controlled while the adhesive cures. Over-tightening can stress a quartz edge, so the objective is firm, even control rather than maximum force. Once the joint is aligned, keep the setter stable for the adhesive manufacturer's required cure time. Removing it too early can allow the seam to shift or separate.
For fabricators and installers, the best seam setters for quartz countertops are therefore not simply the strongest tools. They provide dependable grip, useful height and width adjustment, and enough control to produce a consistent joint without damaging the slab.
Types of Seam Setters: Manual, Electric, Vacuum, and Ratchet
Seam setters use either vacuum cups, mechanical clamps, or a combination of both to grip adjacent slabs and bring the seam into alignment. The right system depends on how much adjustment you need, how accessible the work area is, and the thickness and finish of the stone. Quartz and granite can both be handled with professional seam-setting equipment, but polished surfaces require dependable grip and controlled pressure.
Manual seam setters for controlled hand adjustment
Manual models use hand-operated knobs, levers, or threaded mechanisms to pull the slabs together and adjust their relative height. They are a practical choice for installers who want direct feedback while closing a joint, especially on smaller jobs or seams that need careful incremental correction. A manual tool can also be useful when power is unavailable or when the setter must be repositioned several times during dry fitting.
Look for manual seam setters with enough adjustment range for the slab thickness you install most often. The tool should hold firmly without requiring excessive force. Over-tightening can stress a quartz edge and increase the risk of micro-cracking, so the goal is controlled pressure, not maximum pressure.
Electric joint setters for faster repeatable adjustments
Electric joint setters add powered adjustment to the seam-setting process. That can reduce hand effort and make repeated installations more consistent for fabrication or installation teams handling multiple seams. They are well suited to production environments where speed matters, provided the operator still monitors the joint and stops when the slabs are flush.
An electric joint setter is worth considering when the crew needs repeatable movement and less manual tightening. Choose the tool based on its supported slab thickness and adjustment range rather than power alone. Quartz and granite vary in thickness and edge configuration, and a setter must maintain adequate clamp strength across the actual workpiece.
Vacuum seam setters for grip on polished stone
Vacuum models attach through suction cups placed on the slab surfaces near the seam. High-friction cups help prevent sliding on polished quartz and granite, making this style useful when the surface finish leaves little room for mechanical contact. The cups must sit on a clean, sound surface. Dust, residue, or an imperfect seal can reduce holding power and allow movement while the adhesive cures.
For surface-driven grip, compare vacuum seam setters with attention to cup quality, seal condition, and vacuum monitoring. Inspect the rubber gaskets before use, and do not rely on suction alone without checking that the slabs remain stable. Many vacuum systems also include leveling controls, allowing one tool to pull the joint tight and fine-tune the elevation.
Ratchet and clamp systems for mechanical holding force
Ratchet and clamp systems use mechanical tension to draw the slab pieces together. They can be a straightforward option for installers who prefer a robust, visible clamping action, particularly when the setup does not favor vacuum cups. A ratchet seam setter can suit granite and quartz when the contact points are positioned correctly and the pressure is increased gradually.
Automatic systems combine features that reduce manual adjustment, while still requiring the operator to verify the joint. Review automatic seam setters when repeated work calls for faster setup and consistent alignment. Regardless of style, use a level to confirm flatness, keep pressure even across the seam, and select clamp capacity for the slab thickness. These checks matter more than the mechanism's label when the goal is a tight, flush joint.
What to Look For in the Best Seam Setters for Quartz Countertops
The best setter balances control, grip, and portability rather than complication. The tool should let you bring the joint together without losing control of height, gap, or pressure. It should also hold securely on polished quartz while the adhesive cures. Because quartz thickness varies, confirm that the setter's clamp capacity and working range suit the slabs on your current jobs.
Use the comparison below to narrow the field. These categories overlap in practice, but each favors a different balance of precision, force, and mobility.
| Category | Adjustment range | Clamp strength | Cup grip | Portability | Best for |
|---|---|---|---|---|---|
| Manual | Good micro-adjustment for height and joint width when operated carefully. | Controlled mechanical force; verify capacity for slab thickness. | Usually depends on the supplied suction cups and surface preparation. | High; simple to carry and use without power. | Installers who want direct control and a compact setup. See manual seam setters. |
| Electric | Fast, repeatable adjustment with less manual effort. | Strong powered action, but pressure still needs to be matched to the quartz edge. | Varies by model; confirm that the cups are rated for polished stone. | Moderate; account for the tool, power source, and accessories. | Production crews handling repeated seams. Review electric joint setters. |
| Vacuum | Fine positioning when the cups maintain a consistent hold. | Effective pull across the joint, subject to clean surfaces and gasket condition. | High-friction cups are essential for preventing movement on polished quartz. | High to moderate, depending on pump and gauge design. | Polished slabs and jobs where stable surface contact matters. Consider vacuum seam setters. |
| Ratchet | Incremental pull adjustment for bringing a stubborn joint together. | High mechanical leverage; use restraint near finished edges. | Grip depends on the cup design and contact surface. | High; useful where access or power is limited. | Field repairs, confined spaces, and controlled joint pulling. See ratchet seam setters. |
Prioritize precision over maximum force
A useful setter provides micro-adjustments in two directions: vertical adjustment to bring slab faces flush, and horizontal adjustment to manage the joint width. Leveling dials can help fine-tune height and reduce lippage, but the tool should be used with a level rather than treated as a substitute for one. Verify flatness as you adjust, then apply even pressure across the seam so the adhesive bond remains consistent. Professional seam setters commonly perform both jobs, pulling the pieces together and helping maintain a flush elevation. For more on the tools and mounting hardware available, see the Diamond Tool Store stone fabrication tools collection.
Match grip and capacity to the slab
For polished quartz, high-friction suction cups help prevent sliding, but they cannot compensate for dust, residue, or worn gaskets. Clean the contact areas before attaching the cups and inspect the seals regularly. Also check the setter's rated range against the slab thickness. Too little clamp capacity can leave the joint unstable, while unnecessary force can stress a finished edge. The goal is controlled, repeatable pressure, not the highest possible pull.
Finally, consider where the work happens. Compact, portable systems are easier to move through residential interiors and position around cabinets. If the crew regularly works without reliable power, a manual or ratchet design may be the practical choice. If seam volume is high, an electric system can reduce effort, provided its adjustment controls and cup arrangement still give the installer precise feedback.
How Do You Align Quartz Countertop Seams and Avoid Lippage?
Seam alignment is controlled by setup order, measured adjustments, and steady pressure. A seam setter can pull slabs together while holding them level, but it cannot compensate for contaminated surfaces, poor cup placement, or excessive force. Set up deliberately so the joint closes without shifting either slab.
Clean and secure both slabs first
Before attaching vacuum cups, clean the quartz around the seam. Dust, slurry, adhesive residue, and small chips can reduce vacuum hold or create a high spot under the cup. A clean surface also helps prevent scratching while the setter is clamped. Inspect the cup faces and rubber gaskets before use. Worn gaskets can compromise the hold during alignment.
Attach a cup to each slab, keeping the setters positioned so they pull across the joint rather than at an angle. Confirm that each cup has full contact with the polished surface. If the tool has a vacuum gauge, check that the pressure is stable before beginning the adjustment. High-friction vacuum cups are intended to minimize sliding on polished quartz, but they still depend on clean, sound contact.
Close the joint before fine-tuning height
Use the horizontal adjustment to draw the slabs together gradually. The goal is a tight, consistent joint, not maximum tension. Work from one setter to the next in small increments so pressure remains distributed along the seam. Even pressure supports a uniform adhesive bond and helps produce the nearly invisible joint expected in a professional installation.
Once the joint is closed, use the leveling dials to fine-tune vertical alignment. Adjust the high slab down or the low slab up in small movements while watching the seam under good lighting. The leveling function is what helps prevent lippage, but it should be used as a controlled correction rather than a substitute for accurate fabrication or substrate preparation.
Verify flatness and tighten only as needed
Place a professional-grade level across the seam and check the surface in more than one direction. Run a fingertip across the joint as a quick tactile check, then rely on the level for confirmation. Recheck after each small dial adjustment. Precise positioning creates tighter, less visible joints, but the adhesive still needs the slabs held in position while it cures.
Micro-tighten the setter only enough to maintain contact and alignment. Over-tightening can concentrate stress at the quartz edge and contribute to micro-cracking. If the seam begins to shift, stop and diagnose the cause instead of adding force. Check cup contact, slab support, joint fit, and setter position. Keep the alignment system stable for the adhesive manufacturer's required cure time before removal.
This sequence gives a professional seam setter from Diamond Tool Store a controlled job to do: pull the slabs together, level the faces, and hold the joint steady while the bond develops.
Matching Adhesive to Quartz, Granite, and Resin Content
Seam setter performance depends on more than clamp strength. The adhesive must match the countertop material, and the setter must hold the joint in the correct position while that adhesive develops strength. Quartz and granite should not be treated as interchangeable surfaces during seam preparation.
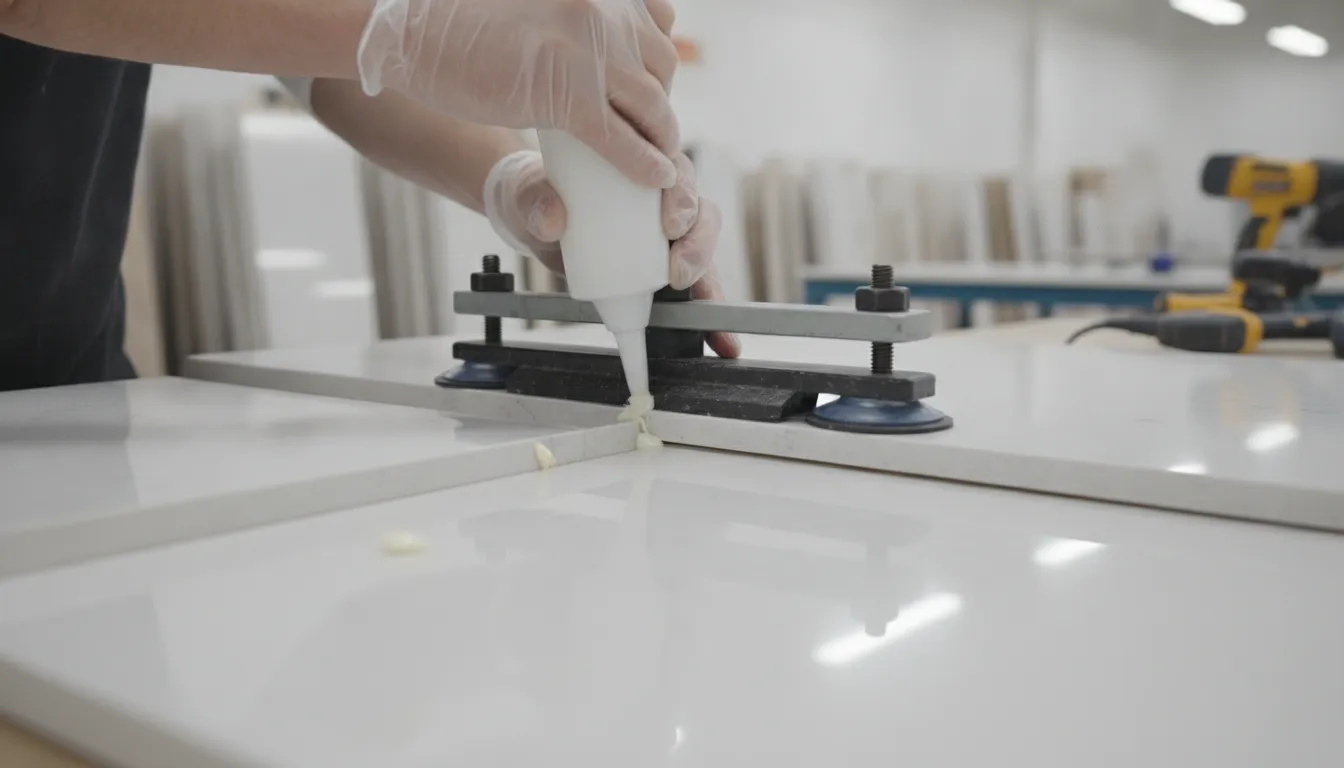
Quartz resin content changes adhesive selection
Engineered quartz is manufactured with resin, while granite is a natural stone with different surface and bonding characteristics. That difference affects adhesive selection and setting technique. High-resin engineered stone may require a specialized adhesive compound formulated for that material. Select the adhesive according to the stone manufacturer's guidance and the adhesive manufacturer's technical data. Rather than assuming a product suitable for granite will produce the same result on quartz.
Compatibility also includes color, working time, and the joint conditions. The adhesive should be appropriate for the quartz or granite color and should give the installer enough open time to bring the slabs together. Remove excess material, and make final alignment adjustments. The goal is not simply to fill the gap. It is to create a durable, clean joint that remains stable under normal countertop use. Diamond Tool Store notes that adhesive selection should be compatible with engineered-stone resin content for a seamless joint (see the stone fabrication tools collection).
Hold consistent pressure until the seam cures
Apply adhesive evenly along the prepared seam, then use the seam setter to pull the slabs together and bring their faces into the same plane. Consistent pressure matters because an unevenly loaded joint can leave variations in bond thickness or allow one section of the seam to shift. Avoid over-tightening. Excessive force can stress the slab edge and increase the risk of micro-cracking, especially on engineered stone.
Use the setter's leveling controls, when available, to fine-tune the height while checking the surface with a professional-grade level. Keep the cups or clamps stable as the adhesive cures. A setter that slips, loses vacuum, or is disturbed too early can let the joint separate or develop lippage before the bond has reached its required strength.
Do not remove the seam setters based only on the adhesive's surface appearance. Follow the manufacturer's stated cure-time and strength guidelines, including any temperature or humidity conditions that affect curing. Leave the joint supported for the full required period, then remove the setters carefully and inspect the seam before final cleanup. Proper compatibility, even bond pressure, and controlled curing work together to produce the tight, flush result expected from professional countertop fabrication.
The Mirror-Cut Seam Technique for Tighter Joints
A mirror-cut seam is a simple shop technique for improving the fit between two quartz or granite pieces before adhesive is applied. Instead of relying only on the original seam cut, you temporarily open the joint, support it with thin shims, and cut both pieces together. The result is a slightly angled seam that closes tightly at the visible top while retaining a small amount of space below for adhesive.
Precise positioning is the foundation of a less visible countertop seam. Seam setters can help bring the pieces into alignment, but the mirror cut improves how the two edges meet. It takes only a few extra minutes when the pieces are already set up in the shop. And it can produce a tighter, more chip-resistant joint when performed with a clean, continuous-rim diamond blade.
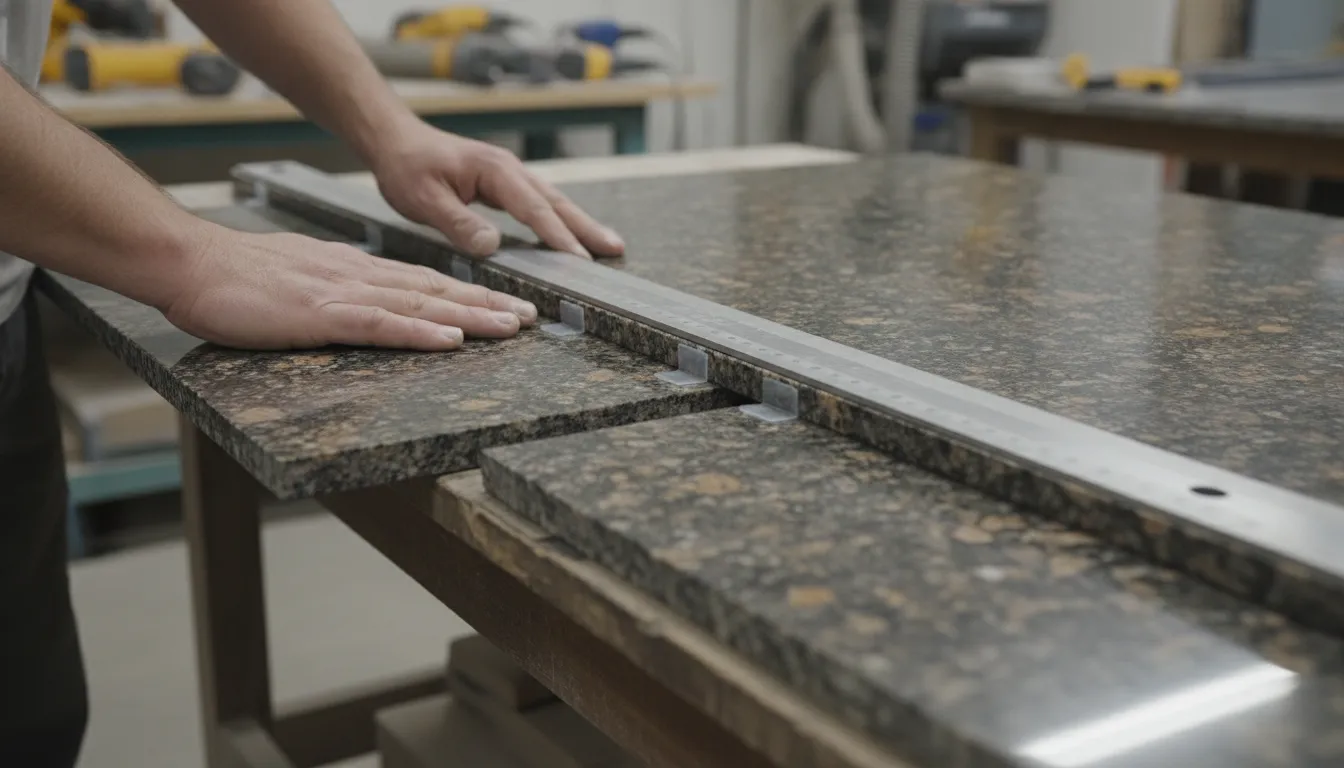
- Dry fit the seam. Bring the quartz or granite pieces together in the shop and check the fit before applying adhesive. Use a straight edge to true up the front edge so the exposed countertop faces align consistently from one end to the other.
- Open the top edge slightly. Place 1/16-inch plastic horseshoe shims in the middle and at each end of the seam. The shims should open the top edge just enough to create a controlled cutting gap without shifting the pieces out of position.
- Cut through the seam and shims. With the pieces held securely, cut through the center of the seam and the plastic shims using a continuous-rim diamond blade. Keep the cut steady and controlled. The blade should pass through both edges as one aligned cut rather than creating separate, mismatched cuts.
- Remove the shims and inspect the joint. Pull out all of the plastic horseshoe shims and discard them. The finished seam should have a very narrow angled cut at the top for the tightest visible fit. With a slight reveal at the bottom to give adhesive more area to hold. Clean away dust and debris before proceeding with the approved adhesive and seam-setting process.
After the mirror cut, use your seam setters to bring the pieces together and check the joint from the front, top, and underside. The tool should support precise positioning without forcing the slabs together aggressively. A controlled fit matters more than maximum clamp pressure. Once the adhesive is applied, keep the pieces stable for the manufacturer-specified cure time before removing the setters.
This technique is especially useful when the seam will be highly visible under strong countertop lighting. It does not replace accurate fabrication, a clean edge, or compatible adhesive, but it gives the installer another way to refine the joint before bonding. Combined with the right seam setters and stone fabrication tools, the mirror cut helps create a tighter, cleaner finish with less visible joint movement.
Professional Seam Setters at Diamond Tool Store
Diamond Tool Store is a master distributor of specialized equipment for stone fabrication, countertop installation, construction, and restoration. Its seam-setter selection is built around a practical question: which alignment method gives your crew the control, speed, and portability the job requires? For the broader setup, see the stone fabrication shop equipment checklist.
Quick answer: For the best seam setters for quartz countertops, pick the system that matches how your crew works.
- Manual setter: direct control for straightforward shop or field work.
- Automatic model: repeatable operation for production work.
- Electric joint setter: faster cycles for frequent installations.
- Ratchet setter: controlled, incremental mechanical tightening.
- Vacuum setter: fast positioning on polished, non-porous surfaces.
The right choice depends on your workflow, slab thickness, access, and preferred level of adjustment.
Match the setter to the shop's workflow
Manual seam setters are a dependable choice when installers want direct control over each adjustment. They suit smaller shops, occasional seam work, and field installations where a compact tool is easy to carry and set up. The manual seam setter tools option is a practical starting point for fabricators who need precise alignment without adding powered equipment.
For higher-volume work, automatic and electric systems can reduce repetitive effort and support faster installation cycles. The automatic seam setters for quartz are suited to teams that value repeatable operation, while the electric joint setters fit shops handling frequent countertop seams and larger production demands. Professional alignment tools can improve efficiency and reduce rework when a crew is completing multiple installations in a day. Which makes workflow consistency as important as raw clamping force.
Ratchet setters offer a familiar mechanical approach with controlled tightening. The ratchet seam setter options can be useful when an installer wants incremental tension and a straightforward setup in the shop or at the jobsite. Vacuum setters are a strong fit for polished, non-porous stone when clean, high-friction cups can hold the pieces in position. Review the vacuum seam setter technology option when portability and quick placement are priorities.
What professional crews should prioritize
Compact alignment systems are easier to transport through confined residential spaces, so portability matters when fabrication and installation happen in different locations. Also confirm that the setter provides enough adjustment for the countertop thickness and joint geometry. A tool that allows controlled pulling and leveling is more useful than one that only closes the gap. Use even pressure, avoid over-tightening, and verify the surface with a professional level before the adhesive cures. Those habits help protect the quartz edge while supporting a tighter, less visible joint.
Browse professional seam setters and stone fabrication tools at Diamond Tool Store.
Frequently Asked Questions
Do I need a seam setter for quartz seams?
For professional quartz installation, a seam setter is strongly recommended. It pulls the two countertop pieces together and holds them level while the adhesive cures, helping produce a tight, flush joint and reducing the risk of lippage. A setter that performs both pulling and leveling is especially useful when one tool must control the joint in two directions.
How do I choose the best seam setter for my installation?
Match the setter to the slab thickness, surface condition, and work you perform most often. Look for secure vacuum cups or mechanical clamps, adjustment controls for both joint width and height, and enough working range for the material. Clean the quartz before attaching vacuum cups, and inspect rubber gaskets for wear so the tool maintains a reliable hold.
Can I use seam setters on granite as well as quartz?
Yes. Quality seam setters can be used with both engineered quartz and natural granite, provided the cups or clamps are suitable for the surface and slab thickness. The joining process still requires material-appropriate adhesive because quartz contains resin and may have different bonding requirements from granite.
How do I prevent lippage when joining quartz pieces?
Set the pieces in position, clean and attach the cups, then use the leveling adjustment to bring both surfaces flush before applying consistent closing pressure. Check the seam with a level and avoid over-tightening. Excessive clamping force can stress the quartz edge and create micro-cracking, while uneven pressure can produce an inconsistent bond.
Ready to Choose the Right Seam Setter?
The right alignment system can make quartz and granite seam work more controlled, helping you bring pieces together accurately while the adhesive cures.
Shop seam setters and stone fabrication tools from Diamond Tool Store to compare options for your next installation, or call (800) 342-3876 to talk with the team about the alignment system that fits your work.