Learning how to use stone router bits starts with more than choosing an edge profile. A fabricator must match the diamond bit to the stone and machine, support the slab so it cannot move, control water or dust, and keep every pass deliberate. The result should be a stable, repeatable edge that is ready for inspection and polishing, not a rushed cut that creates chips, heat damage, or rework.
This guide focuses on the operating workflow for handheld and CNC stone routers. It complements Diamond Tool Store selection resources such as the stone router bit profiles and materials guide, rather than replacing the machine manual or the bit manufacturer's instructions. Always use the operating limits, guards, coolant requirements, and PPE specified for the tool in front of you.
What should you check before using a stone router bit?
Before using a stone router bit, confirm the stone, finished edge, bit profile, shank or holder, machine compatibility, operating limits, and cooling method. Inspect the bit for damage, support the slab fully, clear the work area, and test the setup on scrap or an expendable section before routing the finished piece.
Start with a short job specification. Record the material, slab thickness, edge profile, amount of stock to remove, machine type, and whether the process is wet or dry. Granite, quartz, marble, porcelain, engineered stone, and concrete can respond differently under the same tool. If the material or tool instructions are unclear, stop and confirm compatibility before turning on the machine.
- Confirm the material: Identify the actual slab or component, not just the customer's general description.
- Confirm the profile: Compare the bit shape with the shop drawing, template, or required finished edge.
- Confirm the interface: Check the shank, collet, arbor, holder, or spindle connection against the machine specifications.
- Confirm the process: Verify whether the bit is intended for wet work, dry work, or a specific coolant delivery system.
- Confirm the operating limits: Use the manufacturer's RPM, feed, depth-of-cut, and usage guidance for that exact tool.
- Inspect the tool: Reject a bit with a cracked body, loose segment, damaged thread, distorted holder, or excessive wear.
Diamond Tool Store's diamond tools collection is a useful starting point for identifying the broader cutting, grinding, and polishing workflow. For a purchase comparison, use the separate diamond router bit buying guide and then return to the machine and material checks in this procedure.
How do you use stone router bits on different edges?
Choose a stone router bit by matching five items: material, profile, operation, machine interface, and cooling method. Use an aggressive tool for controlled stock removal only when the manufacturer allows it, and reserve finer or continuous-rim tooling for the shaping and finishing stages it is designed to perform.
Bit selection should follow the finished edge backward through the work. First identify the geometry, such as an eased, bevel, bullnose, cove, or ogee profile. Then decide whether the first pass will remove stock, establish the profile, or refine an existing shape. One bit may not be the correct choice for every stage. A heavy removal pass and a finishing pass place different demands on the diamond surface.
| Selection check. | What to verify. | Why it matters. |
|---|---|---|
| Material. | Granite, quartz, marble, porcelain, engineered stone, or concrete. | Hardness, brittleness, and composition affect cutting behavior and wear. |
| Profile. | Finished edge shape and slab thickness. | The cutting surface must reach the intended section without creating a mismatched edge. |
| Operation. | Stock removal, profiling, smoothing, or preparation for polishing. | The tool must be suited to the amount of material and finish required. |
| Interface. | Shank, collet, arbor, holder, or CNC spindle. | A correct profile is unusable if the attachment is incompatible. |
| Cooling. | Wet delivery, dry extraction, or the specified process. | Cooling and dust control affect tool life, cut quality, and worker exposure. |
For granite countertop work, the granite router bit selection guide can help separate profile and machine-fit decisions from the operating steps below. Do not infer an RPM or feed rate from a similar-looking tool. Bit diameter, bond, machine power, material, and the manufacturer's limits all affect the safe operating window.
How do you set up the slab and workholding?
Set the slab on a rigid, level, and fully supported surface. Use pads or supports that protect the finished face, prevent flex, and keep clamps or fixtures outside the router path. Secure the workpiece against movement, confirm the edge is accessible, and test the setup before making a production pass.
Workholding is part of the cut, not a separate housekeeping step. A stone slab that shifts, flexes, or vibrates can chip at the edge even when the bit and machine are correct. Support the workpiece along its length and near the active area without placing a support where the bit, water line, vacuum shoe, or clamp will travel. Avoid relying on a small number of suction cups or a narrow overhang for a large, heavy piece.
- Place the slab on a stable fabrication table or approved machine bed.
- Use non-marring pads or sacrificial material where the workpiece contacts the support.
- Keep the edge being routed close enough to the support to prevent vibration, while leaving room for the tool body.
- Clamp or fixture the slab according to the machine and stone manufacturer's instructions.
- Check that clamps, templates, hoses, power cords, and drain paths are outside the travel area.
- Mark the start and stop points, profile limits, and any areas that require a lighter approach.
Before routing a valuable piece, make a dry inspection of the entire travel path with the machine off. On CNC equipment, verify the work offset, tool length, program origin, tool library entry, and simulation. On a handheld router, confirm that the base or guide sits flat and that the operator can keep both the tool and the hose or cord under control without reaching across the bit.
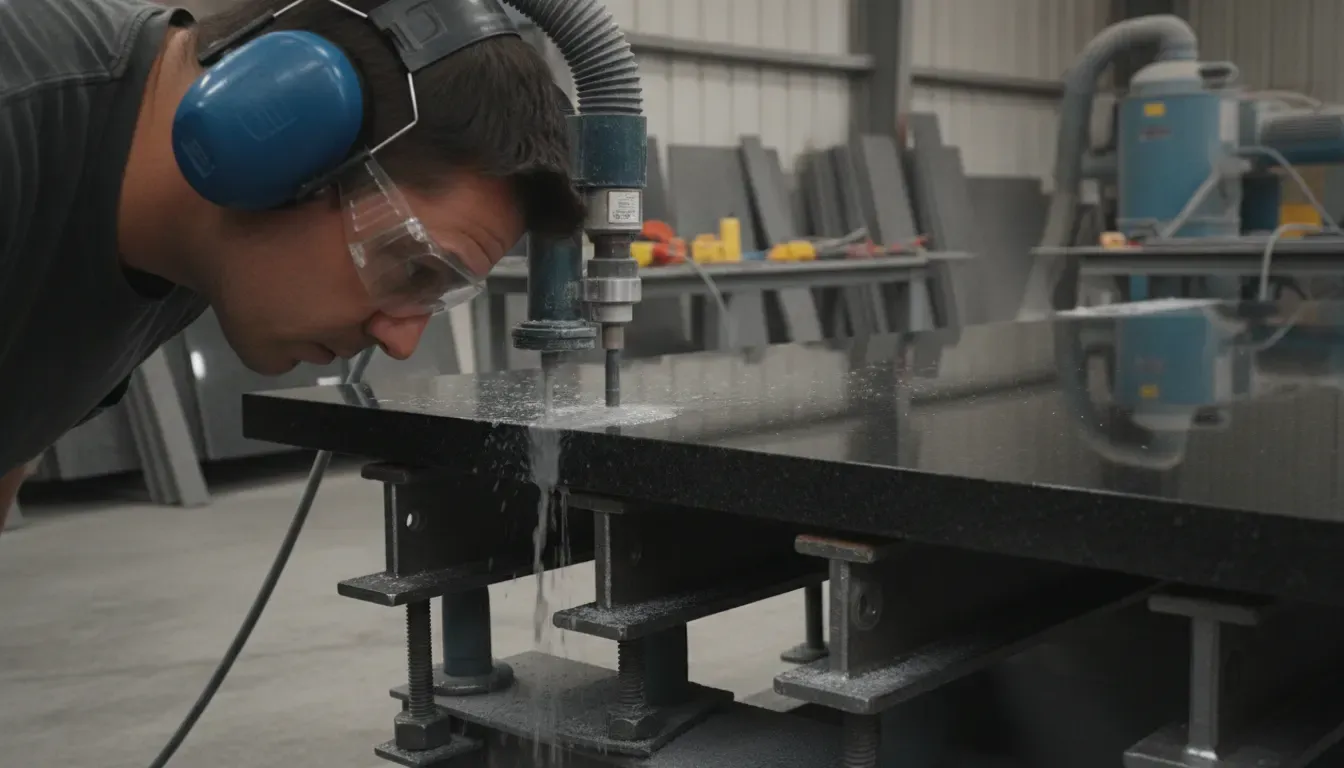
How should you use PPE and machine safety controls?
Use eye and hearing protection, protective footwear, suitable work clothing, and the machine's required guards and shields. Treat stone dust as a serious exposure hazard. Wet methods, local exhaust, housekeeping, exposure assessment, training, and respiratory protection must follow the applicable OSHA requirements and the employer's written safety program.
Routing stone can create flying fragments, high noise, wet-floor hazards, and respirable crystalline silica exposure. The updated NIOSH and OSHA countertop hazard alert addresses exposure during countertop manufacturing, finishing, and installation. OSHA's construction silica standard also sets requirements for exposure controls, housekeeping, training, and respiratory protection where it applies. Employers must determine which standard and program requirements cover their work.
At a minimum, use the PPE and controls required by the tool, machine, employer, and applicable regulations:
- Safety glasses with side protection, plus a face shield when the risk assessment or machine instructions call for one.
- Hearing protection suited to the router and shop noise level.
- Safety footwear with slip-resistant soles for wet fabrication areas.
- Clothing that cannot catch on rotating tooling, and hair or jewelry secured away from the machine.
- Guarding, splash protection, and electrical protection installed as specified by the machine manufacturer.
- A properly selected respirator only within a compliant respiratory protection program when required by exposure conditions.
Do not bypass a guard, hold the stone by hand near the bit, direct slurry toward electrical connections, or use compressed air to blow settled dust into the breathing zone. Keep walkways dry enough to prevent slips, route hoses and cords safely, and stop the machine before changing a bit, clearing a jam, adjusting a fixture, or reaching into the travel path.
How do you control water, slurry, and dust?
Keep the cutting zone consistently wet when the tool is specified for wet routing, and aim water at the point where the diamonds contact the stone. For dry work, use the approved dust-extraction and work-practice controls. Water on the table alone is not enough, and wet routing does not remove the need for cleanup and exposure controls.
Cooling and dust control solve related but different problems. Water can carry heat and debris away from the active contact point, while wetting can reduce airborne dust. The NIOSH field report on stone countertop grinding found that the way the work area is wetted matters, so do not assume that a puddle near the slab means the cutting zone is controlled. Use the delivery method specified for the router and bit, and check the contact area while working.
For wet routing
- Confirm that the router, bit, hose, pump, and electrical setup are approved for wet use.
- Start water flow before the bit contacts the stone.
- Keep a steady stream at the contact point rather than flooding only the surrounding table.
- Control runoff so the slab remains stable and the operator does not stand in pooled water.
- Pause if the stream stops, the slurry becomes unusually thick, or the contact area begins to dry.
- Collect and dispose of slurry according to the shop's procedures instead of allowing residue to dry into airborne dust.
For dry routing
Dry routing requires a machine, bit, and dust-control system specifically intended for that process. Use local exhaust or other approved engineering controls, keep the extraction path open, and follow the employer's exposure control plan. Do not switch a wet-rated operation to dry simply because water is inconvenient. If the dust-control method cannot keep the work within the required exposure controls, stop and resolve the setup before continuing.
What feed technique produces a cleaner edge?
Let the diamond cutting surface do the work at the manufacturer's recommended operating range. Keep the router supported, move at a steady feed, avoid dwelling in one spot, and use lighter staged passes instead of forcing a deep cut. Sound, vibration, slurry, heat, and chip size are useful warning signals.
Set the machine according to the exact bit and material instructions, then make the first pass on scrap or a concealed section. A steady feed keeps the diamonds engaged without loading the tool. Pushing too hard can overload the segments, while moving too slowly or stopping in one spot can build heat. Follow the machine manufacturer's required travel direction and never use a climb-cut or other technique unless the tool instructions specifically allow it.
For handheld work, keep the base or guide flat against the reference surface. Use two hands when the tool design requires it, maintain a balanced stance, and move through the cut without twisting the router. For CNC work, confirm that the toolpath does not dwell at corners, the entry and exit are controlled, and the programmed feed is appropriate for the tool, material, and machine. The correct setting is the one supported by the manufacturer and verified through a controlled test, not a number copied from a different router.
- Chipping at entry: Check support, entry technique, profile alignment, and whether the first pass is too heavy.
- Burning or discoloration: Check water delivery, dwell time, feed, and the bit's condition before continuing.
- Squealing or vibration: Stop and inspect workholding, runout, attachment, and machine settings.
- Uneven profile: Check guide pressure, slab movement, tool alignment, and the consistency of the pass.
- Slow cutting: Inspect for glazing or wear, then verify that the bit bond and operating method suit the material.
How should you make edge passes and finish the profile?
Make the edge in controlled stages: establish the reference, remove only the planned amount of stock, refine the profile, and prepare the surface for polishing. Keep each pass aligned with the workholding and inspect between stages. Stop before a small defect becomes a full-length edge repair.
Before the first full pass, mark the profile limits and identify any sink, corner, seam, or end condition that needs a different approach. Start where the tool can settle securely, then move through the edge at a consistent rate. If the profile requires multiple tools, use them in the intended order rather than asking a finishing bit to remove excessive stock.
- Establish the reference: Confirm the guide, template, slab edge, and tool position.
- Make a light test pass: Check alignment, water or extraction, chip size, and the initial shape.
- Remove stock in stages: Keep the tool moving and avoid a deep pass that overloads the diamond surface.
- Refine the profile: Use the appropriate finer or finishing tool when the rough shape is correct.
- Ease transitions: Approach corners, ends, seams, and cutouts with the technique required by the machine and profile.
- Clean before polishing: Remove slurry or dust using the approved method so defects are visible.
Routing establishes the shape, but it may not produce the final sheen. If the edge needs additional finishing, move to a compatible polishing sequence. Diamond Tool Store's granite and natural stone polishing pads collection covers pads for stages from grinding through high-gloss finishing. Use the pad manufacturer's grit, wet or dry, and attachment guidance rather than treating every pad as interchangeable.
How do you inspect the edge before releasing the piece?
Inspect the edge after cleaning and before polishing or installation. Check the profile against the drawing, look for chips, cracks, burns, flat spots, tool marks, and uneven transitions, and confirm that the edge is consistent from end to end. Record defects and correct the process before repeating the pass.
Inspection should be visual and tactile, but do not run a bare hand along an unprocessed edge. Use appropriate protection and a light source that reveals small chips, scratches, and changes in profile. Compare the routed edge with a sample, template, or approved reference. Check both the visible face and the underside or return where the tool may have left a mismatch.
- Measure or template-check the profile and finished dimensions.
- Look for chips at entry, exit, corners, seams, and transitions.
- Check for darkening, resin damage, glazing, or other signs of excess heat.
- Look for flat spots, ridges, chatter marks, or inconsistent curvature.
- Confirm that the edge is ready for the planned polishing grit or next tool.
- Document the bit, material, machine setting, cooling method, and corrective action if the result is out of tolerance.
If the edge is not right, do not hide the defect with a heavier polishing pass. Stop, identify whether the cause was bit selection, workholding, cooling, feed control, or machine condition, and correct that cause on a test area first. A repeatable setup protects the slab and makes future production more predictable.
Frequently Asked Questions
Can you use regular woodworking router bits on stone?
No. Stone requires tooling designed for abrasive mineral materials, commonly diamond router bits. Confirm the bit, holder, machine, and cooling method are specified for the stone and operation before cutting.
Should stone router bits be used wet or dry?
Use the wet or dry process specified for the exact bit and machine. Wet routing can cool the contact zone and reduce airborne dust, but it requires controlled water delivery and slurry cleanup. Dry routing requires approved dust-extraction and work-practice controls.
How do you prevent chipping when routing stone?
Fully support and secure the slab, match the bit to the material and profile, use a light test pass, keep the feed steady, avoid dwelling, and approach corners or ends with the machine manufacturer's recommended technique. Inspect between staged passes.
What PPE is needed for stone routing?
Use eye protection, hearing protection, safety footwear, suitable work clothing, and the guards or shields specified for the machine. Stone dust controls and respirator use must follow the applicable OSHA requirements and the employer's written exposure and respiratory protection programs.
When should a stone router bit be replaced?
Replace or remove a bit from service when it has a cracked body, loose segment, damaged attachment, excessive wear, glazing that cannot be corrected by the approved process, or a cut quality that remains poor after setup checks. Follow the manufacturer's service and replacement limits.
Stone routing is most reliable when the operator treats every cut as a controlled system: the right diamond tool, a supported workpiece, verified machine settings, consistent cooling or dust control, and inspection between stages. Browse stone router bits at Diamond Tool Store to match the next fabrication job with the appropriate tooling and accessories.